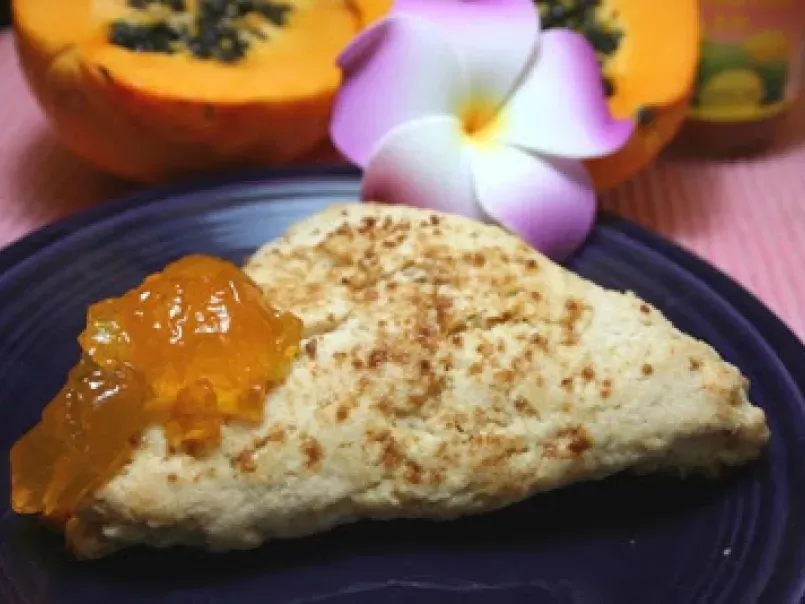
Vegan coconut and lilikoi scones
vote now

This is a tropical vegan scone that is so delicious.
Ingredients
2
You may like
Vegan panna cotta with coconut - video recipe!
Preparation
Preparation15 min
Cook time20 min
- Preheat the oven to 425 F. Lightly oil a cookie baking pan or use a parchment paper to line it.In a food processor, whip the egg replacer and water together until creamy and white.
- Meanwhile, combine the flours, sugar, baking powder, and salt.Cut the cold vegan butter into small pieces or chunks.Add the cut butter into the flour mixture and combine lightly.
- Add the butter and flour mixture into the egg replacer mixture in the food processor.Pulse the food processor while adding the soymilk creamer for about 30 seconds to 1 minute until a dough formed and mixed together.
- Add the 1/2 cup shredded unsweetened dry coconut and continue to mix for another 30 seconds.
- The dough will not be smooth like a bread dough but it should not stick to your fingers too much.Move the dough onto a floured cutting board and form a ball. Then flatten the ball with your hand. Add 1 tablespoon of lilikoi jam and fold over and mix.
- Then, add another 1 tablespoon jam and repeat. The dough may be soften. If it becomes sticky add extra flour until it is not sticky anymore(you may want to lightly flour your hands, as well).
- Then, flatten with your hand to form a 8 or 9-inch circle, 1/2 inch thick. Cut into 8 pieces (like cutting pizza) so that you'll have 8 triangle pieces. Place them 1/2 inch apart on the baking sheet, brush the tops with soymilk creamer or non-dairy milk, and sprinkle with sucanat or vegan sugar. Bake until the tops are brown, about 15 minutes. Let cool on a rack and serve warm with more lilikoi jam.
You tried this recipe ?
Mention @petitchef_en and tag #petitchef
Mention @petitchef_en and tag #petitchef
You may like
-
 Vegan panna cotta with coconut - video recipe!
-
 Vegan bowl with coconut milk yogurt, fruits and nuts
-
 Vegan buddha bowl
-
 Vegan and gluten free pancakes
Questions
Photos of members who cooked this recipe
Photos
Comments
Rate this recipe:
There are no comments!